


Stone Soup
- Oct 19, 2017
- 10 min read
Updated: Jun 21, 2023
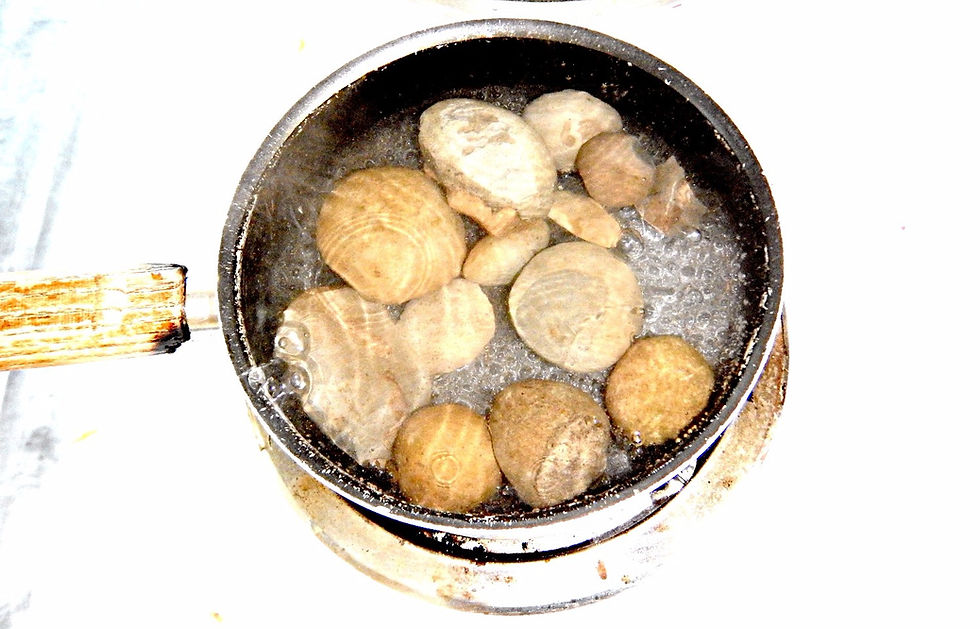
Way, way back when I was just a wee tot, rambling around the decorative gravel at my grandparent's Illinois home, there was a dish best served warm: stone soup. Somewhere between walking the Schnauzer through the cemetery with Grandpa Ferd, losing to Grandma Betty at Chinese checkers, and pilfering gummy bears from the Haribo bag in the pantry, time was made to perform mystical transfigurations on food. Grandma had a holy story book and a special pile of stones to demonstrate just this brand of magic for my sister and I. Add in a dash of Grandmotherly storytelling and Grandfatherly enthusiasm, and the four of us had all the ingredients necessary for stone soup. Granted, the title photo is not my attempt to make stone soup, but rather a boiling pot of fossiliferous concretions from the muddy banks of the Columbia River [Figure 1]. However, I assuredly have a righteous angle for leading you on like this. The tale of stone soup is an oldie and a goodie, so before I take you much further down my concretion rabbit hole, I give you the Wiki version of Stone Soup:

"Some travelers come to a village, carrying nothing more than an empty cooking pot. Upon their arrival, the villagers are unwilling to share any of their food stores with the hungry travelers. Then the travelers go to a stream and fill the pot with water, drop a large stone in it, and place it over a fire. One of the villagers becomes curious and asks what they are doing. The travelers answer that they are making "stone soup", which tastes wonderful, although it still needs a little bit of garnish to improve the flavor, which they are missing. The villager does not mind parting with a few carrots to help them out, so that gets added to the soup. Another villager walks by, inquiring about the pot, and the travelers again mention their stone soup which has not reached its full potential yet. The villager hands them a little bit of seasoning to help them out. More and more villagers walk by, each adding another ingredient. Finally, the stone (being inedible) is removed from the pot, and a delicious and nourishing pot of soup is enjoyed by all. Although the travelers have thus tricked the villagers into sharing their food with them, they have successfully transformed it into a tasty and nutritious meal which they share with the donors."
~ https://en.wikipedia.org/wiki/Stone_Soup
As is the case with most fables, stone soup shows up in other places and by other names. "The stone has been replaced with other common inedible objects, and therefore the fable is also known as axe soup, button soup, nail soup, and wood soup [https://en.wikipedia.org/wiki/Stone_Soup]." Lucky me, our old English version used a rock. The friendly piper in Figure 2 always fascinated me. To be so charming as to swindle selfish, fearful buggers into creating a town-wide meal beloved and consumed by everyone, and then ghosting into the night to do it again. What a dynamo of vagrants, a hero among rockhounds of the world! Admittedly, the practice of making stone soup with the grandparents ran out after my sister and I began to catch on to the moral. Not to mention the redundancy of using our sacred pile of stones to "make" a soup we had just been told did nothing to contribute to the actual meal. Years later, the grandparents would still laugh at our adorable naivete about the whole ordeal, and we would pull out the round native granite and chunky quartz. Tactile reminders passed around to revive a timeless family joke.

Now, on to the boiling of stones as an adult. Join me now in the open kitchen of our Bird Research Northwest crew house in Astoria, OR. This year, it's the blue one, at the end of that arduously inclined hill that is Franklin Ave. There is a small sauce pot on the electric stove, its contents rolling in a boil over half a dozen round masses of concrete. Out of some balls poke the purplish-gray ends of fossilized barnacles and shrimp claws. Some edges are smoothly curved and follow the shape of their orb. Other shapes jut out aggressively from their round cement surface like spoils from a not-quit- broken pinata. The goal in boiling these rocks is to put them in the freezer for several days, then toss them on the stove in the hopes that the temperature change will cause the internal material to bust out from the concrete. In theory, this technique works. After stopping in at Terra Stone's tourist shop in downtown Astoria, I discussed this process with Terra. She and others use a longer weathering process, leaving their finds outside for several weeks, boiling them, and then putting them back outside. According to Terra, this works on those concretions with proportionately larger fossils inside. Whatever the success rate, I am still working out the kinks in my freezer-to-boil extraction technique. The allusion of these rocks to concrete is accurate though, as they are actually hardened balls of clay that, over time, become a natural cement. Welcome to the fabulous world of fossil concretions!
My understanding of concretions was initially sparked by a pair of Moqui marbles I picked up at Jerry's Rock Shop, in Kent, WA. Snagging a few, I reveled over the strange shape and texture of these dark, suspiciously light orbs found in the cliffs of Utah. Moqui marbles are concretions formed in sandstone with an iron-oxide shell [http://www.rocksandminerals.com/specimens/moqui.htm]. If you cut them in half, you will find a heart of dense sand inside. Now, normally you wouldn't want to halve one of these. They are much more interesting whole, especially if you subscribe to their metaphysical properties. I did not list those, as I am antsy about getting down to the fossil bits of this post. Little did I know, while I rolled the iron-oxide marbles in my palm, there were concretions sounding sleeping and ripe for the picking just across the Astoria Bridge [Figure 3]!

The world of concretions is a crazy grab-bag of treats once you find some with fossils inside [Figure 4]. Unlike Moqui marbles, fossil concretions can be much more fun to cut open. Or break open. Or find already broken open. Or -to be an optimistic projector- you can use fancy fossil preparatory techniques to extract their secrets intact. These secrets being invertebrate, mammal, plant, and various marine fossils! Much like thunder eggs, these suckers call for cracking along a specific fault to reveal to the goods within. Unlike thunder eggs, concretions have a much more fragile interior. There is no agate filled cavity here pronouncing glorious and metaphysical messages from the underworld. Well, actually I guess there are, if you count dead things as from the underworld. Inside concretions you will find no agates, opals, or perfect crystalline structures. The forms staying together are delicate chitin exoskeletons, imprints of marine worms, corals, or shells -and those are just some of the ones I didn't decimate while opening them.
Crazy stuff, and super exciting when you happen to come across fossils that blow your little mind [Figures 4 & 5].
To find these foxy fossils, Bristol and I hopped over the Columbia, and found a nice little collecting locale listed in my Gem Trails of Washington Guide. Just off the 401, and down through a tangled mess of thorny flora, we found a muddy beach. It was wildly apparent we had come to the right place, as copious cement orbs greeted us once we hit the mile-long stretch. Given that we had to carry our finds back up the steep trail, we both had to do some serious cherry picking after only about two hours of walking the beach. Bucket in hand, and high on the sheer number of fossils we found just laying open at our feet, Bristol and I made short work of our expedition [Figure 6].

Curious, though, the stretch of beach where we collected was almost shocking in the abruptness with which the concretions appeared and disappeared. Come to find out there are all kinds of reasons for the appearance, abundance, and distribution of fossil concretions in the area.
According to one source, "sections 100 m or less can be measured in tidal exposures, and the relationship between exposures is often difficult to discern. The concretions are continuously being reworked from the landslides and new accumulations appear with sufficient regularity to be collected every two weeks at low tide. Most of the concretions are spherical and composed of fine-grained siltstone with calcareous cement [Moore, 1984, Molluscan Paleontology and Biostratigraphy of the Lower Miocene Upper part of the Lincoln Creek Formation in Southwestern Washington, Contributions in Science, Issue 351]." Moore also shed some light on why the epic snail I cracked out of one concretion is so radically different from other fossils I have come across [Figure 4]. As it goes, mineralization in these fossils takes an interesting turn from other agatized, petrified, etc. organic material, in that the complex sequences of lamintate calcite, sparry calcite, barite, and quartz seen in some specimens actually precipitated in explicitly that order [Moore 1984]. Curious and curiouser!

Finally, this paper by Moore fed me one more fascinating tidbit worth passing on to you: "The geology in the area is complicated by landslides, faults, by few road cuts, and by vegetative cover. Generally, only [she] believe[d] that the concretions are formed early in diagenesis, because the mollusks preserved in the concretions are almost always complete specimens that are neither broken nor do they have any obvious organic center, but most contain fossils, many are bioturbated, and most contain fecal pellets [Moore 1984]." For your edification, diagenesis refers to the physical and chemical changes occurring during the conversion of sediment to sedimentary rocks; bioturbation is the reworking of soils and sediments by animals or plants, and diageneisis is an effect of bioturbation along with bioirrigation, and the displacement of anaerobic particles and microorganisms [minerals.net].
So, not only were we hounding in a fossiliferous honey hole, but there's also the potential to find fecal pellets. Sounds like a party to me! Once I set to cracking and identifying the contents of my bucket, I quickly found my efforts at breaking them open without destroying the contents painfully inept. That, and as Terra inculcated me, the general rule of thumb with finding a fossil in a concretion is one in ten. This is likely a low estimate, but it does good to check your expectations when preparing fossils that require expensive equipment to keep unbroken.
HOW COOL IS THAT?! SCIENCE IN ACTION, PEOPLE!
![Figure 7: Photo Credit- Bruce Thiel. "Inside these pieces lies a large fossil crab given to me by [name omitted] who found it on the Washington coast."](https://static.wixstatic.com/media/907ce7_ed44f8a982764054869e9306a12f24d7~mv2.jpg/v1/fill/w_980,h_735,al_c,q_85,usm_0.66_1.00_0.01,enc_avif,quality_auto/907ce7_ed44f8a982764054869e9306a12f24d7~mv2.jpg)
My Gem Trails of Washington Guide warned us that these babies can be terrible trouble to open on-site. Even so, we managed to find a few that were already in prime condition, and tried to crack some on the beach for funsies. To say we had limited success is being generous. I quickly learned that whacking concretions with a chisel and hammer is a sloppy way of going about freeing their fossils, even if I had a few shining successes [Figure 4]. Later, after posting shots of my favorites online, I was referred to the Facebook page of a Master Concretion Cracker. Enter now, Mr. Bruce Thiel. Bruce is a master of preparing, restoring, and identifying crab fossils from concretions [Figures 7 & 8]! Which is super fly. His tools are pneumatic, powered by an air compressor, his glue is PaleoBond Jurassic Gel, and his work is magnificent. Bruce doesn't sell crabs, but performs his art for educational purposes, although sometimes he prepares a crab for a museum. Based out of Portland, OR, Bruce's work is a primo example of what real skillz (yes, that's skills with a 'z') can find in concretions like the ones we hauled back to the crew house.
Circling back, stone soup is a children's book based around the morals of sharing and alturism. When it comes to finding and preparing fossils from concretions, the morale is the same. With direction from a Facebook group, and some personal advice, the 15 lb. bucket of concretions still staring at me with impossible patience will eventually become a glorious procession of fossils. Hopefully, if not a credit to my efforts as an eternal student, these classy babes will at least add to the enduring legacy of hounding in the Astoria and Knappton areas as pat of my collection. As making stone soup out of concretions is not always recommended, I threw in some instructions from other professionals:
"Generally, most of the matrix should be removed, but it is often wise to leave some of the matrix around the fossil, to increase its stability, and to preserve the geologic context. In many cases fossils are considered less valuable if entirely removed from the matrix. Excess matrix can often be trimmed from soft rocks or relatively thin slabs with pliers or carefully chipped away with a hammer. However, using a saw reduces the chances of damaging the fossil. If you have patience and the rock is not very hard, a hack saw may suffice. More efficient tools include a carbide saw blade on a drill, or rock saws. When removing matrix immediately around the fossil itself, proceed with caution, carefully chipping the matrix away with a sharp tool (such as a sharp nail, awl, hobby knife, or sharpened center punch). Fortunately, in many cases the matrix will tend to separate from the fossil at the point of contact. However, patience is often required to avoid gouging or cracking the fossil itself. Short and careful strokes are better than quick, haphazard ones. Sometimes a shale matrix may be softened by soaking or boiling it in detergent and water. However, some soft shales will absorb water, swell up, and then disintegrate --destroying any fossils in them. Other fossils occur in very hard, often oval-shaped nodules called concretions. These may be split with careful hammer hits along the long axis, or by alternately freezing the specimen and then dropping it in boiling water."
~http://paleo.cc/kpaleo/fossprep.htm

If you want to take the route of museum-quality treatment, I say go for the gold! Although, it may take some serious investment of time, self-teaching, and a bit of good old greenback, but the rewards will undoubtedly be great. Look up the pressure requirements for Paleo tools you want to use, and then see whether you need a cheapo air compressor or a pricey one to run them. If a cheapo, save up some cash and make a sound investment. If the compressor is pricey, ask around at pawn shops that may have one, or resolve to borrow one from the local tool library. Opening and restoring these things has now become a long-term hobby for me, requiring research, interviews, a saving plan to afford the tools, PaleoBond Jurassic Gel, a microscope viewing lens, and display pegs. A rainy day activity for sure. Please, fall with me into this Wonderland of Concretions! I'll see you there.
Happy Hounding!
Comments